Взлом: различия между версиями
Дополнительные действия
Rirma4ch (обсуждение | вклад) Нет описания правки |
Rirma4ch (обсуждение | вклад) Нет описания правки |
||
| Строка 245: | Строка 245: | ||
<center>'''Воздушная сигнализация'''<br>[[File:AirAlarm.png|64px]]</center> | <center>'''Воздушная сигнализация'''<br>[[File:AirAlarm.png|64px]]</center> | ||
Станция затоплена плазмой, а все Атмостехи и CE некомпетентны и/или мертвы? Лучше взять дело в свои руки! | |||
# | #'''Открутите [[Screwdriver|отверткой]]''' '''[[File:Screwdriver_tool.png]]'''панель, чтобы обнажить проводку. | ||
#'''Пульсируйте [[Engineering_items#Multitool|мультитулом]] [[File:Multitool.png]]'''провода, чтобы узнать что они делают, а '''[[Engineering_items#Wirecutters|кусачками]] [[File:Wirecutters.png]]''' режьте. | |||
#'''Закрутите '''[[Screwdriver|'''отверткой''']] '''[[File:Screwdriver_tool.png]]'''панель на место, после получения желаемого (см. таблицу ниже) результата. | |||
# | |||
# | |||
# | |||
{| class="wikitable" style="text-align:center" | {| class="wikitable" style="text-align:center" | ||
|+ | |+Провода | ||
! | !Назначение | ||
!Cutting | !Cutting | ||
!Mending | !Mending | ||
| Строка 271: | Строка 259: | ||
|- | |- | ||
!Power | !Power | ||
| | |Отключает питание.||Восстанавливает питание.||Включает/отключает питание. | ||
|- | |- | ||
! | ! ID Scan | ||
| | |Полностью блокирует интерфейс до устранения неполадки.||Убирает блокировку.||Включает/выключает блокировку идентификатора интерфейса. | ||
|- | |- | ||
!Siphon | !Panic Siphon | ||
| | |Включает функцию PANIC SIPHON||-||Включает/выключает функцию PANIC SIPHON. | ||
|- | |- | ||
!AI | !AI Connection | ||
| | |Отключает доступ ИИ и Киборгам.||Возвращает доступ ИИ и Киборгам.||Временно (~30 сек) отключает доступ ИИ и Киборгам. | ||
|- | |- | ||
!Alarm | !Alarm | ||
| | |Включает тревогу.||Ничего не делает.||Убирает тревогу. | ||
|} | |} | ||
</div></div> | </div></div> | ||
| Строка 292: | Строка 280: | ||
<center>'''Камеры'''<br>[[File:Security_Camera.gif|64px]]</center> | <center>'''Камеры'''<br>[[File:Security_Camera.gif|64px]]</center> | ||
Неисправный ИИ не сможет выкачивать ваш воздух, если вы отключите его глаза. | |||
У камер нет проводной панели, просто нажмите на камеру инструментами, чтобы ее взломать. | |||
# | #'''Открутите [[Screwdriver|отверткой]]''' '''[[File:Screwdriver_tool.png]]'''панель, чтобы обнажить проводку. | ||
# | #Теперь вы можете сделать одно из двух: | ||
#*'''Wirecutters''': | #*'''Обрезать провода [[File:Wirecutters.png]]''': Разрезание камеры отключит её, а починка — снова включит. После этого камера будет отображаться в списке как неисправная. | ||
#*'''Multitool''': | #*'''Пульсировать[[File:Multitool.png]]''': Пульсирование переключает диапазон обзора камеры с 7 тайлов (по умолчанию) на 2. ИИ не получит никаких оповещений. | ||
ИИ получит уведомление о срабатывании камеры при ее активации или в случае ее отключения с помощью грубой силы. | |||
</div></div> | </div></div> | ||
<div class="colstr-panel"> | <div class="colstr-panel"> | ||
| Строка 308: | Строка 296: | ||
<div class="colstr-content"> | <div class="colstr-content"> | ||
<center>'''Киборги'''<br>[[File:Generic_borg.png|64px|link=Cyborg]]</center> | <center>'''Киборги'''<br>[[File:Generic_borg.png|64px|link=Cyborg]]</center> | ||
Используйте эти инструменты в указанном порядке, чтобы взломать Киборга: | |||
#[[File:Id_regular.png]] | #Разблокируйте панель Киборга, кликнув по нему картой с доступом Робототехника [[File:Id_regular.png]] , [[Емаг|Емагните]] [[File:Emag.png]] или просто попросите борга разблокировать панель. | ||
#[[File:Crowbar.png]] | #Ломом [[File:Crowbar.png]] откройте панель. | ||
#[[File:Emag.png]] | #Опционально: [[Емаг|Емагните]] [[File:Emag.png]] киборга и отправляйтесь к "После" (не сработает, если ИИ [[Guide_to_malfunction|Малф]]). | ||
# [[File:Hud-hands.gif]] | # [[File:Hud-hands.gif]] Извлеките батарейку, нажав на борг пустой рукой. | ||
#[[File:Screwdriver_tool.png]] | #Отверткой [[File:Screwdriver_tool.png]] оголите провода. | ||
#[[File:Wirecutters.png]] | #Кусачками [[File:Wirecutters.png]] или Мультитулом [[File:Multitool.png]] работайте с проводами | ||
После: | |||
#'''[[Screwdriver|отверткой]]''' '''[[File:Screwdriver_tool.png]]''' скройте провода. | |||
#Замените/вставьте обратно батарейку[[File:Power_cell.png]]. | |||
#Ломом[[File:Crowbar.png]] закройте панель. | |||
#Заблокируйте киборга картой [[File:Id_regular.png]]. Киборги не могут самостоятельно блокировать её. | |||
{| class="wikitable" style="text-align:center" | {| class="wikitable" style="text-align:center" | ||
! | !Название | ||
! | !Назначение | ||
! Cutting | ! Cutting | ||
!Mending | !Mending | ||
! Pulsing | ! Pulsing | ||
|- | |- | ||
! Law | ! AI Law Synchronization | ||
| | | Законы боргов обновляются одновременно с законами их главного ИИ. Работает только при активном режиме связи c ИИ||Не дает боргу получать обновления законодательства от своего ИИ||Восстанавливает функционал||Синхронизирует законы с искусственным интеллектом борга | ||
|- | |- | ||
! | !AI Connection | ||
| | |Привязывает борга к ИИ, заставляя его подчиняться его приказам. Требуется для AI Law Synchronization||Освобождает борга от его текущего ИИ и отключает AI Law Synchronization||Ничего||Позволяет выбрать ИИ, к которому будет привязан борг | ||
|- | |- | ||
!Camera | !Camera | ||
| | |Отвечает за камеру борга ||Выключает камеру||Включает камеру||Включает/отключает камеру | ||
|- | |- | ||
!Lockdown | !Lockdown | ||
| | |Блокирует борга. Также можно использовать консоль робототехники||Блокирует борга||Отключает блокировку||Включает/отключает блокировку | ||
|- | |- | ||
! | !Reset Module | ||
| | | Сбрасывает модуль борга, чтобы он мог выбрать другой|| Сбрасывает модуль Киборга и не позволяет ему выбрать новый||Позволяет боргу выбрать новый модуль||Ничего | ||
|- | |- | ||
! | !Два фиктивных провода | ||
| | | colspan="4" |Ничего | ||
|} | |} | ||
У [[Емаг|Емагнутых]] [[File:Emag.png]] киборгов не будет связи с ИИ и его нельзя сбросить: его нужно будет разобрать (или взорвать) и собрать заново. | |||
Старайтесь не взрывать боргов. Считайте это всё равно, что обычное убийство: вас задушат, если только вы не сделали этого по уважительной причине. | |||
</div></div> | </div></div> | ||
<div class="colstr-panel"> | <div class="colstr-panel"> | ||
| Строка 372: | Строка 356: | ||
{| class="wikitable" style="text-align:center" | {| class="wikitable" style="text-align:center" | ||
|+Wires | |+Wires | ||
! | !Название | ||
! Cutting | ! Cutting | ||
| Строка 400: | Строка 384: | ||
<center>'''Консоль заказа товаров'''<br>[[File:Supply_Shuttle_Console.png|64px]]</center> | <center>'''Консоль заказа товаров'''<br>[[File:Supply_Shuttle_Console.png|64px]]</center> | ||
WКто-то хочет заказать [[Квартирмейстер#Контрабанда|контрабанду]]? | |||
Это позволяет вам заказывать контрабанду (например, высокотехнологичные принадлежности для клоуна). Это не даст вам столько же много новых поставок, как [[Емаг]] [[File:Emag.png]] консоли. Кроме того, вы сможете продавать органы, не предназначенные для наград (по мизерным ценам). | |||
#[[ | #Доберитесь к плате консоли, при помощи отвертки '''[[File:Screwdriver_tool.png]]''', кусачек '''[[File:Wirecutters.png]]'''и лома[[File:Crowbar.png]]. | ||
# Нажмите мультитулом'''[[File:Multitool.png]]'''по плате, что бы расширить список поставок. | |||
#Multitool | #Установите плату обратно и соберите консоль. Теперь вы можете заказывать и продавать контрабанду! | ||
# | </div></div> | ||
<div class="colstr-panel"> | |||
<div class="colstr-header">[[File:Requests_Console.gif|64px|link=]] Консоль Запроса<span class="arrow">▼</span> | |||
</div> | |||
<div class="colstr-content"> | |||
<center>'''Консоль Запроса'''<br>[[File:Requests_Console.gif|64px]]</center> | |||
Недовольны уровнем приоритета ваших запросов? Поднимите его до «EXTREME»! | |||
#Откройте ломом[[File:Crowbar.png]] панель консоли запросов ломом. | |||
#Используйте отвертку '''[[File:Screwdriver_tool.png]]''', чтобы включить скрытый уровень приоритета. | |||
#Crowbar | #Закройте ломом[[File:Crowbar.png]] панель . | ||
# | |||
# | |||
</div></div> | </div></div> | ||
<div class="colstr-panel"> | <div class="colstr-panel"> | ||
| Строка 423: | Строка 409: | ||
<div class="colstr-content"> | <div class="colstr-content"> | ||
<center>'''Ускоритель частиц'''<br>[[File:ParticleAccelerator.png|64px]]</center> | <center>'''Ускоритель частиц'''<br>[[File:ParticleAccelerator.png|64px]]</center> | ||
Есть ли более безопасный способ освободить [[Сингулярность]], чем сделать это ДИСТАНЦИОННО? Можно взломать ускоритель (Дальше PA), чтобы он стрелял более мощными частицами! | |||
# | #'''Открутите [[Screwdriver|отверткой]]''' '''[[File:Screwdriver_tool.png]]'''панель на мониторе, чтобы обнажить проводку. | ||
#'''Пульсируйте [[Engineering_items#Multitool|мультитулом]] [[File:Multitool.png]]'''провода, чтобы узнать что они делают, а '''[[Engineering_items#Wirecutters|кусачками]] [[File:Wirecutters.png]]''' режьте. | |||
#'''Закрутите '''[[Screwdriver|'''отверткой''']] '''[[File:Screwdriver_tool.png]]'''панель на место, после получения желаемого (см. таблицу ниже) результата. | |||
# | #'''Не забудьте еще раз отсканировать детали!''' | ||
# | |||
# | |||
# | |||
Вы также можете прикрепить к этим проводам '''[[Signaler|Сигналлер]][[Файл:Signaler.png|ссылка=Signaler]]''', чтобы высвободить сингулярность дистанционно, подав импульс на провод '''Strength'''. Бонусные баллы будут добавлены, если вы также пошлёте импульс на провод '''Interface''', чтобы никто не смог помешать вам! | |||
{| class="wikitable" style="text-align:center" | {| class="wikitable" style="text-align:center" | ||
|+ | |+Провода | ||
! | !Название | ||
!Cutting | !Cutting | ||
!Mending | !Mending | ||
| Строка 444: | Строка 426: | ||
|- | |- | ||
!Power | !Power | ||
| | | Отключает PA||Повторно включает PA||Включает / выключает PA | ||
|- | |- | ||
!Strength | !Strength | ||
| | |Устанавливает силу на 0 и отключает возможность ее увеличения||Возвращает нормальную функциональность||Увеличивает силу PA на 1 | ||
|- | |- | ||
! Interface | ! Interface | ||
| | | Отключает управление интерфейсом, выводя консоль из строя||Включает управление интерфейсом||Переключает управление интерфейсом | ||
|- | |- | ||
!Limit | !Limit | ||
| | |Повышает максимальный предел силы до уровня 3||Возвращает настройку максимальной силы на Уровень 2||Ничего | ||
|- | |- | ||
! | !Два фиктивных провода | ||
| | | colspan="3" |Ничего | ||
|} | |} | ||
</div></div> | </div></div> | ||
<div class="colstr-panel"> | <div class="colstr-panel"> | ||
| Строка 476: | Строка 447: | ||
<center>'''Эмиттеры'''<br>[[File:Emitter.png|64px]]</center> | <center>'''Эмиттеры'''<br>[[File:Emitter.png|64px]]</center> | ||
Есть только один провод: подайте на него импульс '''[[Engineering_items#Multitool|мультитулом]] [[File:Multitool.png]]''', чтобы включить излучатель. | |||
</div></div> | </div></div> | ||
<div class="colstr-panel"> | <div class="colstr-panel"> | ||
| Строка 484: | Строка 455: | ||
<center>'''Бомбы'''<br>[[File:Syndicate_Bomb.gif|64px]]</center> | <center>'''Бомбы'''<br>[[File:Syndicate_Bomb.gif|64px]]</center> | ||
Бомба! Ты достаточно крутой парень? | |||
# | # '''Проверьте таймер''' - Если времени еще много, вы можете (вы захотите) попросить костюм разминирования. Если же мало - достигните минимального безопасного расстояния (или постарайтесь не поддаться уговорам). | ||
# Используйте '''Отвертку [[File:Screwdriver_tool.png]]''' для вскрытия защитного люка проводов. | |||
# Взламывайте используя '''Мультитул[[File:Multitool.png]]''' или '''Кусачки [[File:Wirecutters.png]]''' . | |||
# '''Удачи''' | |||
# | |||
# | |||
# | |||
Если разрезать провода бомбы, вероятность срабатывания составляет 2 из 5 (40%). При пульсировании - только 1 из 5 (20%) - хотя вам нужно будет перерезать провод активации, когда вы его найдете. В любом случае будьте осторожны и слушайте сообщения после каждого взлома провода. | |||
{| class="wikitable" style="text-align:center" | {| class="wikitable" style="text-align:center" | ||
!Название | |||
! | |||
!Cutting | !Cutting | ||
!Mending | !Mending | ||
| Строка 507: | Строка 471: | ||
|- | |- | ||
!Activate | !Activate | ||
| | |Останавливает обратный отсчет||Ничего|| | ||
1. Неактивная бомба начнет обратный отсчет <br> | |||
2. Активная бомба "seems to hesitate for a moment" по первому импульсу (таймер +10 с)<br> | |||
3. При дальнейших импульсах, "Nothing Happens." | |||
|- | |- | ||
!Delay | !Delay | ||
| | |Ничего||Ничего||Отображает сообщение, ''"The Bomb chirps.''". | ||
1. Первый импульс увеличивает таймер на 30 секунд<br> | |||
2. Дальнейшие импульсы не действуют | |||
|- | |- | ||
!Bolt | !Bolt | ||
| | |Снимает напольные болты, если они развернуты.||Ничего||Отображает сообщение, "The bolts spin in place for a moment." | ||
|- | |- | ||
!Proceed | !Proceed | ||
| | |Смерть||Вы умерли ||Отображает сообщение, ''"The bomb buzzes ominously!''" | ||
1. Если таймер превышает 60 с, таймер уменьшается на 60<br> | |||
2. Если таймер больше 20, таймер уменьшается на 10<br> | |||
3. Если таймер находится между 10 и 20, таймер установится на 10 секунд<br> | |||
4. Нет эффекта, если таймер меньше 10 секунд | |||
|- | |- | ||
!Boom | !Boom | ||
| | |Смерть||Вы умерли||Смерть | ||
|} | |} | ||
==== Как удалить ядро бомбы ==== | |||
Чтобы извлечь ядро из бомбы синдиката (или сборки бомбы, изготовленной из 10 пластали), выполните следующие действия: | |||
# | #Убедитесь, что бомба не активирована. Если идёт обратный отсчёт, перерезание проводов может привести к её взрыву. | ||
# | #Откройте бомбу с помощью отвертки [[File:Screwdriver_tool.png]]. | ||
# | #Перережьте все провода кусачками [[File:Wirecutters.png]]. | ||
# | #Примените лом [[File:Crowbar.png]] на бомбе, чтобы вытащить ядро. | ||
</div></div> | </div></div> | ||
<div class="colstr-panel"> | <div class="colstr-panel"> | ||
| Строка 558: | Строка 509: | ||
<center>'''С4'''<br>[[File:C4.gif|64px]]</center> | <center>'''С4'''<br>[[File:C4.gif|64px]]</center> | ||
# Два провода и оба подрывают при любом взаимодействии. | |||
Вы можете прикрепить Сигналлер[[Файл:Signaler.png|ссылка=Signaler]], чтобы создать бомбу с дистанционным управлением. | |||
</div></div> | </div></div> | ||
<div class="colstr-panel"> | <div class="colstr-panel"> | ||
| Строка 581: | Строка 519: | ||
<center>'''Вендоматы'''<br>[[File:Vendmed.gif|64px]]</center> | <center>'''Вендоматы'''<br>[[File:Vendmed.gif|64px]]</center> | ||
#'''Открутите [[Screwdriver|отверткой]]''' '''[[File:Screwdriver_tool.png]]'''панель, чтобы обнажить проводку. | |||
#'''Пульсируйте [[Engineering_items#Multitool|мультитулом]] [[File:Multitool.png]]'''провода, чтобы узнать что они делают, а '''[[Engineering_items#Wirecutters|кусачками]] [[File:Wirecutters.png]]''' режьте. | |||
#'''Закрутите '''[[Screwdriver|'''отверткой''']] '''[[File:Screwdriver_tool.png]]'''панель на место, после получения желаемого (см. таблицу ниже) результата. | |||
# | |||
# | |||
# | |||
# | |||
{| class="wikitable" style="text-align:center" | {| class="wikitable" style="text-align:center" | ||
|+ | |+Провода | ||
! | !Название | ||
!Cutting | !Cutting | ||
!Mending | !Mending | ||
! Pulsing | ! Pulsing | ||
|- | |- | ||
! | !Throw | ||
| | |Отключены предохранители, автомат начинает бросаться вещами||Ремонт предохранителей, автомат приходит в норму||Включает / выключает защиту | ||
|- | |- | ||
! Contraband | ! Contraband | ||
| | |Отключает контрабанду, если она включена ||Без эффекта|| Включает доступ к контрабанде. Green light on - контрабанда включена | ||
|- | |- | ||
! | !ID Scan | ||
| | |Отключено сканирование ID, разблокировка производителя||Повторно включает сканирование идентификаторов, блокируя поставщика||Включает / выключает сканирование ID | ||
|- | |- | ||
! | !High Voltage Ground | ||
| | |Электрифицирует автомат до тех пор, пока он не будет отремонтирован||Снимает всю электрификацию на устройстве||Электрифицирует автомат на 30 секунд | ||
|} | |} | ||
</div></div> | </div></div> | ||
| Строка 623: | Строка 549: | ||
<center>'''Защищенные хранилища'''<br>[[File:secure.png|64px]][[File:safe.png|64px]]</center> | <center>'''Защищенные хранилища'''<br>[[File:secure.png|64px]][[File:safe.png|64px]]</center> | ||
#Screwdriver | #'''Открутите [[Screwdriver|отверткой]]''' '''[[File:Screwdriver_tool.png]]'''панель, чтобы обнажить проводку. | ||
#Multitool | #'''Сбросьте пароль [[Engineering_items#Multitool|мультитулом]] [[File:Multitool.png]]'''. | ||
#Screwdriver | #'''Закрутите '''[[Screwdriver|'''отверткой''']] '''[[File:Screwdriver_tool.png]]'''панель на место. | ||
# | #Теперь портфели/сейф запросит поставить новый пароль. Введите пятизначный код и нажмите Е, чтобы установить его. | ||
# | #Введите тот же код и нажмите E, чтобы разблокировать. | ||
</div></div> | </div></div> | ||
<div class="colstr-panel"> | <div class="colstr-panel"> | ||
| Строка 637: | Строка 561: | ||
<center>'''Сейф'''<br>[[File:Vaultsafe.png|64px]]</center> | <center>'''Сейф'''<br>[[File:Vaultsafe.png|64px]]</center> | ||
Cейф можно открыть, выполнив следующие действия, держа в руках [[file:stethoscope.png]]: | |||
# | |||
# | Сейф можно открыть, выполнив следующие действия, держа в руках стетоскоп [[:Файл:Stethoscope.png|Stethoscope.png]]: | ||
# | #Поворачивайте диск влево, пока не услышите "tink", "krink", или "plink". | ||
#Поворачивайте диск вправо, пока не услышите "tonk", "krunk", или "plank" . | |||
#Вращайте диск в другую сторону, пока не услышите звук "Spring", "Sprang", "Sproing", "Clunk", или "Krunk" из сейфа. | |||
#Открывайте. | |||
</div></div> | </div></div> | ||
<div class="colstr-panel"> | <div class="colstr-panel"> | ||
| Строка 648: | Строка 576: | ||
<center>'''Радио'''<br>[[File:Station_Bounced_Radio.png|64px]]</center> | <center>'''Радио'''<br>[[File:Station_Bounced_Radio.png|64px]]</center> | ||
# | #'''Открутите [[Screwdriver|отверткой]]''' '''[[File:Screwdriver_tool.png]]'''провода, чтобы обнажить проводку. | ||
#'''Пульсируйте [[Engineering_items#Multitool|мультитулом]] [[File:Multitool.png]]'''провода, чтобы узнать что они делают, а '''[[Engineering_items#Wirecutters|кусачками]] [[File:Wirecutters.png]]''' режьте. | |||
#'''Закрутите '''[[Screwdriver|'''отверткой''']] '''[[File:Screwdriver_tool.png]]'''провода на место, после получения желаемого (см. таблицу ниже) результата. | |||
Интересно, что маяки слежения также считаются радиостанциями. | |||
# | |||
# | |||
{| class="wikitable" style="text-align:center" | {| class="wikitable" style="text-align:center" | ||
|+ | |+Провода | ||
! | !Название | ||
!Cutting | !Cutting | ||
!Mending | !Mending | ||
| Строка 665: | Строка 589: | ||
|- | |- | ||
!Output | !Output | ||
| | |Отключает динамик||Восстанавливает функционал||Включает/выключает динамик | ||
|- | |- | ||
!Input | !Input | ||
| | |Отключает микрофон.||Восстанавливает функционал||Включает/выключает микрофон | ||
|- | |- | ||
!Dummy | !Dummy | ||
| | | colspan="2" | Ничего||Включает/выключает микрофон и динамик | ||
|} | |} | ||
</div></div> | </div></div> | ||
<div class="colstr-panel"> | <div class="colstr-panel"> | ||
<div class="colstr-header">[[File:Security_Gas_Mask.png|64px|link=]]Офицерская | <div class="colstr-header">[[File:Security_Gas_Mask.png|64px|link=]]Офицерская газмаска<span class="arrow">▼</span> | ||
</div> | </div> | ||
<div class="colstr-content"> | <div class="colstr-content"> | ||
<center>'''Офицерская | <center>'''Офицерская газмаска'''<br>[[File:Security_Gas_Mask.png|64px]]</center> | ||
У СБ противогаза есть скрытая настройка агрессивности. Чем выше агрессивность, тем более злобные крики «щитсека» раздаются при использовании функции HALT. | |||
С помощью отвёртки '''[[File:Screwdriver_tool.png]]''' изменяйте фразы. Для максимальной агрессивности используйте кусачки'''[[File:Wirecutters.png]]'''. Обратите внимание, что после перекусывания '''[[File:Wirecutters.png]]''' сбросить это положение невозможно. | |||
[[Emag|Емаг]] [[File:Emag.png]] изменит обычные фразы на длинную цепочку ругательств. | |||
</div></div> | </div></div> | ||
<div class="colstr-panel"> | <div class="colstr-panel"> | ||
| Строка 692: | Строка 617: | ||
<center>'''Хранилища костюмов'''<br>[[File:Suit_Storage_Unit.png|64px]]</center> | <center>'''Хранилища костюмов'''<br>[[File:Suit_Storage_Unit.png|64px]]</center> | ||
То, что никто не пойдет проверять. | |||
# '''Убедитесь''', что отсек для хранения закрыт. | |||
# '''Открутите [[Screwdriver|отверткой]]''' '''[[File:Screwdriver_tool.png]]'''провода, чтобы обнажить проводку. | |||
#'''Пульсируйте [[Engineering_items#Multitool|мультитулом]] [[File:Multitool.png]]'''провода, чтобы узнать что они делают, а '''[[Engineering_items#Wirecutters|кусачками]] [[File:Wirecutters.png]]''' режьте. | |||
#'''Закрутите '''[[Screwdriver|'''отверткой''']] '''[[File:Screwdriver_tool.png]]'''провода на место, после получения желаемого (см. таблицу ниже) результата. | |||
{| class="wikitable" style="text-align:center" | {| class="wikitable" style="text-align:center" | ||
|+ | |+Провода | ||
! | !Название | ||
! Cutting | ! Cutting | ||
! Mending | ! Mending | ||
| Строка 705: | Строка 633: | ||
|- | |- | ||
!Hack | !Hack | ||
| | |Увеличивает эффективность дезинфекци | ||
[The UV bulb is glowing] | |||
|Восстанавливает низкую мощность дезинфекцию | |||
[The UV bulb is dim] | |||
|Меняет режим дезинфекции | |||
|- | |- | ||
!Safety | !Safety | ||
| | |Отключает проверку безопасности, позволяя проводить дезинфекцию живых людей | ||
[The service light is off] | |||
|Включает безопасность | |||
[The service light is on] | |||
| Включает/выключает проверку безопасности | |||
|- | |- | ||
!High Voltage Circuit | !High Voltage Circuit | ||
| | | colspan="3" |Эффект искр | ||
|- | |- | ||
!Nothing (2 wires) | !Nothing (2 wires) | ||
| | | colspan="3" |Ничего | ||
| | |||
|} | |} | ||
</div></div> | </div></div> | ||
<div class="colstr-panel"> | <div class="colstr-panel"> | ||
| Строка 744: | Строка 659: | ||
<center>'''Тесла катушки'''<br>[[File:Tesla_coil.gif|64px]]</center> | <center>'''Тесла катушки'''<br>[[File:Tesla_coil.gif|64px]]</center> | ||
Всего один провод: подайте на него импульс'''[[File:Multitool.png]]''', чтобы вызвать разряд тока Теслы. Отлично, если вы подключите дистанционный сигнализатор[[Файл:Signaler.png|ссылка=Signaler]]! | |||
</div></div> | </div></div> | ||
Версия от 11:39, 21 сентября 2025
Ваши "Товарищи"
 Изолированные перчатки для полного гашения ударов током.
 Grey Bull делает вас неуязвимым к ударам тока на короткое время
  Отвёртка для вскрытия панелей.
 Кусачки для резки[Cut] и соединения[Mend] проводов.
 Мультитул для дачи импульса[Pulse] по проводам. Не обязателен для большинства взломов, но очень упрощает жизнь.
 Cигналлер можно использовать как колхозную альтернативу мультитулу и для дистанционной подачи импульсов на провода. Прикрепите(attach) один из них к проводу, а затем используйте второй сигналлер для подачи импульсов на этот провод.
 Чертежи станции содержат в себе информацию о всех проводах во взламываемых устройствах. Крайне полезная вещь, если вы не хотите заниматься ручным перебором всех проводов во всех устройствах.
- Инженеры(не атмостехи) видят, за что отвечают провода.
Взлом
 Шлюзы▼
Провода магическим образом меняются местами в начале каждой смены ДЛЯ КАЖДОГО ОТДЕЛА. Например, если оранжевый провод переключает болты на шлюзе в инженерном отделе, то этот же провод будет делать то же самое на других шлюзах, НО ТОЛЬКО В ЭТОМ ЖЕ ОТДЕЛЕ.
Помните, что отключение питания двери приведет к прекращению работы всего остального.
- Держа отвёртку в руках, откройте панель шлюза, чтобы обнажить провода управления.
- Нажмите с помощью мультитулаили кусачек , чтобы получить доступ к проводам.
- Держа мультитул в активной руке, нажмите [pulse] чтобы подать импульс на провод, или держа кусачки нажмите [cut] чтобы разрезать провод.
- Снова возьмите отвёртку чтобы закрутить панель обратно.
- В шлюзе имеются два основных и два дополнительных провода питания.
- Отключение любого основного провода питания (импульсом или перекусыванием) приведет к тому, что резервное (aux) питание заработает через 10 секунд. Отключение как основного, так и вспомогательного провода питания приведет к потере питания двери до тех пор, пока не будет восстановлено основное или вспомогательное питание.
- Когда дверь обесточена, её можно открыть при помощи Ломика
 , если конечно болты не выдвинуты.
- Когда дверь обесточена, её можно открыть при помощи Ломика
- Отключение провода контроля ИИ приведёт к невозможности взаимодействия с этой дверью ИИ и киборгов. Однако, они всё равно смогут взломать эту дверь рано или поздно. Процесс занимает около минуты, позволяя синтетикам пользоваться дверью, даже если соответствующий провод отключен.
| Провода | |||
|---|---|---|---|
| Название | Cut | Mending | Pulse |
| Main Power x2 | Отключает основное питание. Может ударить током, но не электризует дверь. | Восстанавливает основное питание шлюза. Может ударить током, но не электризует дверь. | Отключает основное питание на минуту. Повторный импульс бесполезный. |
| Auxiliary Power x2 | Отключает резервное питание. Может ударить током, но не электризует дверь. | Восстанавливает резервное питание шлюза. Может ударить током, но не электризует дверь. | Отключает резервное питание на минуту. Повторный импульс бесполезный. |
| ID Scan | Дверь отказывает в доступе всем без исключений, если на её плате есть хоть какие-то ограничения. Однако, если в таком состоянии дать импульс на провод open(открытие), дверь распахнётся. | Восстанавливает прежний режим работы сканера ID. | Дверь будет пищать и мигать лампочками, будто к её пытается открыть кто-то без доступа. |
| Bolts | Опускает болты. | - | Меняет положение болтов. |
| Bolt Lights | Отключает индикацию состояния болтов. Делая невозможным визуальное определение их положения. | Возвращает индикацию в рабочее состояние. | Переключает индикацию, но не сами болты. |
| Open | - | - | Открывает дверь, но только если на плате управления конкретной двери не установлено никаких ограничений, либо провод ID scan(сканирование ID) перерезан. |
| AI Connection | Отключает синтетикам возможность управления дверью. | Возвращает синтетикам возможность управления дверью. | На мгновение отбирает у ИИ контроль. |
| High Voltage Ground | Наэлектризовывает дверь. Является защитным механизмом от взлома. При попытке любых взаимодействий с дверью, оная бьёт током взломщика и искрит, привлекая внимание. Чем больше резервная мощность в электросети станции, тем сильнее удар током. | Снимает электрификацию. | Электризует дверь на 30 секунд. |
| High Voltage Circuit x2 | С высокой вероятностью бьёт взломщика током, но не электризует дверь. | С высокой вероятностью бьёт взломщика током, но не электризует дверь. | - |
| Safety | Отключает датчик присутствия, позволяя двери закрываться, даже если в ней кто-то стоит. | Возвращает датчик в рабочее положение. | Переключает режим датчика. |
| Timing | Отключает таймер, отвечающий за закрытие двери. После открытия дверь больше не закроется, пока её не закроют в ручную, при наличии соответствующего доступа. | Возвращает таймер в рабочее положение. | Переключает время до закрытия.
Выкл - долгое закрытие Вкл - быстрое закрытие Невозможно переключить, если провод обрезан. |
| Nothing x2 | - | ||
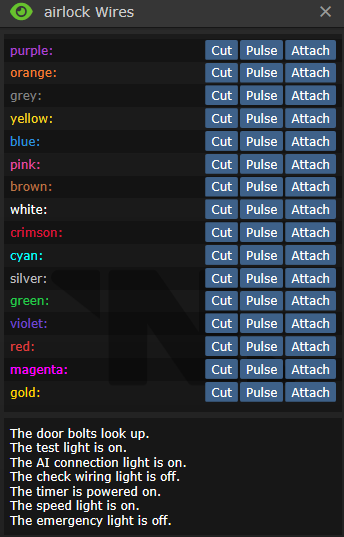
| Определяем состояние двери по индикаторам в панели | ||
|---|---|---|
| Название лампочки | Статус | Это значит что... |
| Bolts | The door bolts look up. | Болты подняты (открыто). |
| The door bolts have fallen! | Болты опущены (блокировка). | |
| Power | The test light is on. | Есть питание |
| The test light is off. | Дверь обесточена (можно открыть при помощи лома | |
| AI Connection | The AI connection light is on. | ИИ контролирует дверь в штатном режиме. |
| The AI connection light is off. | ИИ не может контролировать дверь. | |
| Safety | The 'Check Wiring' light is on. | Датчик присутствия отключен (дверь крошит экипаж). |
| The 'Check Wiring' light is off. | Датчик присутствия включен (дверь не крошит экипаж). | |
| Timer | The timer is powered on. | Дверь может закрыться сама. |
| The timer is powered off. | Дверь не может закрыться сама. | |
| Timing | The speed light is on. | Дверь на долгой задержке (закрывается через время). |
| The speed light is off. | Дверь на короткой задержке (закрывается как только через неё прошли). | |
| Emergency light | The emergency light is on. | Включен аварийный доступ (дверь откроется даже тому у кого нет карты). |
| The emergency light is off. | Аварийный доступ отключен (дверь проверяет доступ на карте). | |
Некоторые шлюзы имеют защиту от взлома, в виде листа прочного материала между крышкой панели и проводами. Степень защиты можно определить осмотрев шлюз.
|
Чтобы защитить панель шлюза, примените два листа |
Чтобы максимально защитить панель шлюза, примените два листа |
| |
Некоторые отдельные шлюзы являются специальными "шлюзами с аварийным открытием", что означает, что их можно открыть голыми руками, после задержки, в обесточенном состоянии, а не с помощью ломика ![]() . Некоторые шлюзы в отсеках общественного пользования обладают такой опцией.
. Некоторые шлюзы в отсеках общественного пользования обладают такой опцией.
 АПЦ▼
АПЦ▼
Контролирует электропитание в назначенном помещении. Все АПЦ могут управляться через компьютеры мониторинга питания, независимо от состояния блокировки, так что надейтесь, что тот, кто возится с питанием, не обращает на это внимания.
- Возьмите Отвертку(screwdriver) в руки, нажмите на АПЦ, чтобы открыть панель и обнажить проводку.
- Свободной рукой получите доступ к проводам.
- Мультитулом(multitool) пульсируйте провода, чтобы узнать что они делают, а кусачками(wirecutters) режьте.
- Закрутите(screwdriver) панель на место, после получения желаемого (см. таблицу ниже) результата.
- Блокировка крышки АПЦ не позволит получить доступ к аккумулятору. Крышка автоматически блокируется при закрытии. Открывать и закрывать крышку можно ломом(crowbar) .
- Блокировка интерфейса АПЦ не позволит никому им пользоваться, в том числе снимать блокировку крышки. Тем не менее, открыть панель отвёрткой всегда можно. Блокировка снимается любой ID-картой с инженерным доступом.
| Назначение | Перерезание | Соединение | Импульс |
|---|---|---|---|
| Power (2 wires)
(Питание (2 провода)) |
Отключает питание. Может ударить током. | Включает питание. Может ударить током. | Отключает питание на две минуты. Разрежьте и соедините провод, чтобы восстановить питание сразу. |
| ID lock
(Сканнер ID) |
Отключает возможность переключить режим блокировки с помощью ID-карты | Возвращает сканнер в прежнее состояние | Снимает блокировку АПЦ на 30сек. |
| AI control
(Управление ИИ) |
Отключает возможность управления для ИИ и киборгов. | Возвращает контроль для синтетиков | На мгновение отключает возможность управления для ИИ и киборгов. |
| Индикатор | Состояние индикатора | Означает что: |
|---|---|---|
| Lock | The interface light is red. | АПЦ заблокирован |
| The interface light is green. | АПЦ разблокирован | |
| Power | The short indicator is on. | АПЦ не работает |
| The short indicator is off. | АПЦ работает | |
| AI control | The AI connection light is off. | ИИ утратил контроль над этим АПЦ |
| The AI connection light is on. | ИИ управляет этим АПЦ |
 Печатающие машины▼


- Кликните по машинерии, отвёрткой(screwdriver) чтобы открыть панель.
- Тут всего два провода, которые нас интересуют. Первый - питание, его лучше не трогать, второй - ограничитель. Вот как раз ограничитель и нужно отключить. Свидетельством отключения ограничителя служит горящий синий индикатор в панели индикаторов. Остальные провода ничего не делают, но могут ударить током.
После взлома машинерии вы можете пробавляться с некоторыми новыми опциями.
| Назначение | Обрезать | Mending | Pulsing |
|---|---|---|---|
| Питание (индикатор красный, если выключено) | Отключение питания | Включение питания | Эффект как от обрезания, но только на 30сек. |
| Электрификация (Индикатор зелёный, если включено) | Электрификация | Выключение электрификации | |
| Взломанные опции (Индикатор голубой, если включено) | Удачный взлом! | Выключает взломанные функции |
 Воздушная сигнализация▼

Станция затоплена плазмой, а все Атмостехи и CE некомпетентны и/или мертвы? Лучше взять дело в свои руки!
- Открутите отверткой панель, чтобы обнажить проводку.
- Пульсируйте мультитулом провода, чтобы узнать что они делают, а кусачками режьте.
- Закрутите отверткой панель на место, после получения желаемого (см. таблицу ниже) результата.
| Назначение | Cutting | Mending | Pulsing |
|---|---|---|---|
| Power | Отключает питание. | Восстанавливает питание. | Включает/отключает питание. |
| ID Scan | Полностью блокирует интерфейс до устранения неполадки. | Убирает блокировку. | Включает/выключает блокировку идентификатора интерфейса. |
| Panic Siphon | Включает функцию PANIC SIPHON | - | Включает/выключает функцию PANIC SIPHON. |
| AI Connection | Отключает доступ ИИ и Киборгам. | Возвращает доступ ИИ и Киборгам. | Временно (~30 сек) отключает доступ ИИ и Киборгам. |
| Alarm | Включает тревогу. | Ничего не делает. | Убирает тревогу. |
 Камеры▼

Неисправный ИИ не сможет выкачивать ваш воздух, если вы отключите его глаза.
У камер нет проводной панели, просто нажмите на камеру инструментами, чтобы ее взломать.
- Открутите отверткой панель, чтобы обнажить проводку.
- Теперь вы можете сделать одно из двух:
- Обрезать провода : Разрезание камеры отключит её, а починка — снова включит. После этого камера будет отображаться в списке как неисправная.
- Пульсировать: Пульсирование переключает диапазон обзора камеры с 7 тайлов (по умолчанию) на 2. ИИ не получит никаких оповещений.
- Обрезать провода
ИИ получит уведомление о срабатывании камеры при ее активации или в случае ее отключения с помощью грубой силы.
 Киборги▼
Используйте эти инструменты в указанном порядке, чтобы взломать Киборга:
- Разблокируйте панель Киборга, кликнув по нему картой с доступом Робототехника
 , Емагните
  или просто попросите борга разблокировать панель.
 - Ломом откройте панель.
- Опционально: Емагните киборга и отправляйтесь к "После" (не сработает, если ИИ Малф).
 Извлеките батарейку, нажав на борг пустой рукой.
- Отверткой оголите провода.
- Кусачками или Мультитулом работайте с проводами
После:
- отверткой скройте провода.
- Замените/вставьте обратно батарейку
 .
. - Ломом закройте панель.
- Заблокируйте киборга картой . Киборги не могут самостоятельно блокировать её.
| Название | Назначение | Cutting | Mending | Pulsing |
|---|---|---|---|---|
| AI Law Synchronization | Законы боргов обновляются одновременно с законами их главного ИИ. Работает только при активном режиме связи c ИИ | Не дает боргу получать обновления законодательства от своего ИИ | Восстанавливает функционал | Синхронизирует законы с искусственным интеллектом борга |
| AI Connection | Привязывает борга к ИИ, заставляя его подчиняться его приказам. Требуется для AI Law Synchronization | Освобождает борга от его текущего ИИ и отключает AI Law Synchronization | Ничего | Позволяет выбрать ИИ, к которому будет привязан борг |
| Camera | Отвечает за камеру борга | Выключает камеру | Включает камеру | Включает/отключает камеру |
| Lockdown | Блокирует борга. Также можно использовать консоль робототехники | Блокирует борга | Отключает блокировку | Включает/отключает блокировку |
| Reset Module | Сбрасывает модуль борга, чтобы он мог выбрать другой | Сбрасывает модуль Киборга и не позволяет ему выбрать новый | Позволяет боргу выбрать новый модуль | Ничего |
| Два фиктивных провода | Ничего | |||
У Емагнутых ![]() киборгов не будет связи с ИИ и его нельзя сбросить: его нужно будет разобрать (или взорвать) и собрать заново.
киборгов не будет связи с ИИ и его нельзя сбросить: его нужно будет разобрать (или взорвать) и собрать заново.
Старайтесь не взрывать боргов. Считайте это всё равно, что обычное убийство: вас задушат, если только вы не сделали этого по уважительной причине.
 Мулботы▼

No better way to get away from it all with a joyride on a MULE! And run over some people with it too.
- Unlock the controls with a Quartermaster's/Cargo Technician's/Head Of Personnel's/Captain's ID.
- Unscrew the maintenance panel with the screwdriver.
- See the table below and hack what you want.
- Screw the panel back on.
| Название | Cutting | Mending | Pulsing |
|---|---|---|---|
| Power (2 wires) | One or both cut = disables power. | Restores. | The charge light flickers. -message. |
| Motor (2 wires) | One cut = increases speed slightly. Other cut = increases speed greatly. Both cut = disables motor. |
Restores. | The drive motor whines briefly. -message. |
| Radio (4 wires) | One or more cut = disables PDA control. | Restores. | You hear a radio crackle. -message. |
| Safety | Disables safety, awakens thirst for blood. (DON'T DO THIS UNLESS YOU'RE A TRAITOR OR WANT TO DIE) |
Restores. | The external warning lights flash briefly. -message. |
| Load | Allows non-standard cargo (people, cyborgs, and other bots). | Disables. | The load platform clunks. -message. |
 Консоль заказа товаров▼

WКто-то хочет заказать контрабанду?
Это позволяет вам заказывать контрабанду (например, высокотехнологичные принадлежности для клоуна). Это не даст вам столько же много новых поставок, как Емаг ![]() консоли. Кроме того, вы сможете продавать органы, не предназначенные для наград (по мизерным ценам).
консоли. Кроме того, вы сможете продавать органы, не предназначенные для наград (по мизерным ценам).
- Доберитесь к плате консоли, при помощи отвертки , кусачек и лома.
- Нажмите мультитуломпо плате, что бы расширить список поставок.
- Установите плату обратно и соберите консоль. Теперь вы можете заказывать и продавать контрабанду!
 Консоль Запроса▼

Недовольны уровнем приоритета ваших запросов? Поднимите его до «EXTREME»!
- Откройте ломом панель консоли запросов ломом.
- Используйте отвертку , чтобы включить скрытый уровень приоритета.
- Закройте ломом панель .
 Ускоритель частиц▼

Есть ли более безопасный способ освободить Сингулярность, чем сделать это ДИСТАНЦИОННО? Можно взломать ускоритель (Дальше PA), чтобы он стрелял более мощными частицами!
- Открутите отверткой панель на мониторе, чтобы обнажить проводку.
- Пульсируйте мультитулом провода, чтобы узнать что они делают, а кусачками режьте.
- Закрутите отверткой панель на место, после получения желаемого (см. таблицу ниже) результата.
- Не забудьте еще раз отсканировать детали!
Вы также можете прикрепить к этим проводам Сигналлер![]() , чтобы высвободить сингулярность дистанционно, подав импульс на провод Strength. Бонусные баллы будут добавлены, если вы также пошлёте импульс на провод Interface, чтобы никто не смог помешать вам!
, чтобы высвободить сингулярность дистанционно, подав импульс на провод Strength. Бонусные баллы будут добавлены, если вы также пошлёте импульс на провод Interface, чтобы никто не смог помешать вам!
| Название | Cutting | Mending | Pulsing |
|---|---|---|---|
| Power | Отключает PA | Повторно включает PA | Включает / выключает PA |
| Strength | Устанавливает силу на 0 и отключает возможность ее увеличения | Возвращает нормальную функциональность | Увеличивает силу PA на 1 |
| Interface | Отключает управление интерфейсом, выводя консоль из строя | Включает управление интерфейсом | Переключает управление интерфейсом |
| Limit | Повышает максимальный предел силы до уровня 3 | Возвращает настройку максимальной силы на Уровень 2 | Ничего |
| Два фиктивных провода | Ничего | ||
 Эмиттеры▼

Есть только один провод: подайте на него импульс мультитулом ![]() , чтобы включить излучатель.
, чтобы включить излучатель.
 Бомбы▼

Бомба! Ты достаточно крутой парень?
- Проверьте таймер - Если времени еще много, вы можете (вы захотите) попросить костюм разминирования. Если же мало - достигните минимального безопасного расстояния (или постарайтесь не поддаться уговорам).
- Используйте Отвертку для вскрытия защитного люка проводов.
- Взламывайте используя Мультитул или Кусачки .
- Удачи
Если разрезать провода бомбы, вероятность срабатывания составляет 2 из 5 (40%). При пульсировании - только 1 из 5 (20%) - хотя вам нужно будет перерезать провод активации, когда вы его найдете. В любом случае будьте осторожны и слушайте сообщения после каждого взлома провода.
| Название | Cutting | Mending | Pulsing |
|---|---|---|---|
| Activate | Останавливает обратный отсчет | Ничего |
1. Неактивная бомба начнет обратный отсчет |
| Delay | Ничего | Ничего | Отображает сообщение, "The Bomb chirps.".
1. Первый импульс увеличивает таймер на 30 секунд |
| Bolt | Снимает напольные болты, если они развернуты. | Ничего | Отображает сообщение, "The bolts spin in place for a moment." |
| Proceed | Смерть | Вы умерли | Отображает сообщение, "The bomb buzzes ominously!"
1. Если таймер превышает 60 с, таймер уменьшается на 60 |
| Boom | Смерть | Вы умерли | Смерть |
Как удалить ядро бомбы
Чтобы извлечь ядро из бомбы синдиката (или сборки бомбы, изготовленной из 10 пластали), выполните следующие действия:
- Убедитесь, что бомба не активирована. Если идёт обратный отсчёт, перерезание проводов может привести к её взрыву.
- Откройте бомбу с помощью отвертки .
- Перережьте все провода кусачками .
- Примените лом на бомбе, чтобы вытащить ядро.
 С4▼
С4▼

- Два провода и оба подрывают при любом взаимодействии.
Вы можете прикрепить Сигналлер![]() , чтобы создать бомбу с дистанционным управлением.
, чтобы создать бомбу с дистанционным управлением.
 Вендоматы▼

- Открутите отверткой панель, чтобы обнажить проводку.
- Пульсируйте мультитулом провода, чтобы узнать что они делают, а кусачками режьте.
- Закрутите отверткой панель на место, после получения желаемого (см. таблицу ниже) результата.
| Название | Cutting | Mending | Pulsing |
|---|---|---|---|
| Throw | Отключены предохранители, автомат начинает бросаться вещами | Ремонт предохранителей, автомат приходит в норму | Включает / выключает защиту |
| Contraband | Отключает контрабанду, если она включена | Без эффекта | Включает доступ к контрабанде. Green light on - контрабанда включена |
| ID Scan | Отключено сканирование ID, разблокировка производителя | Повторно включает сканирование идентификаторов, блокируя поставщика | Включает / выключает сканирование ID |
| High Voltage Ground | Электрифицирует автомат до тех пор, пока он не будет отремонтирован | Снимает всю электрификацию на устройстве | Электрифицирует автомат на 30 секунд |
 Защищенные хранилища▼


- Открутите отверткой панель, чтобы обнажить проводку.
- Сбросьте пароль мультитулом .
- Закрутите отверткой панель на место.
- Теперь портфели/сейф запросит поставить новый пароль. Введите пятизначный код и нажмите Е, чтобы установить его.
- Введите тот же код и нажмите E, чтобы разблокировать.
 Сейф▼
Сейф▼

Cейф можно открыть, выполнив следующие действия, держа в руках  :
:
Сейф можно открыть, выполнив следующие действия, держа в руках стетоскоп Stethoscope.png:
- Поворачивайте диск влево, пока не услышите "tink", "krink", или "plink".
- Поворачивайте диск вправо, пока не услышите "tonk", "krunk", или "plank" .
- Вращайте диск в другую сторону, пока не услышите звук "Spring", "Sprang", "Sproing", "Clunk", или "Krunk" из сейфа.
- Открывайте.
 Радио▼

- Открутите отверткой провода, чтобы обнажить проводку.
- Пульсируйте мультитулом провода, чтобы узнать что они делают, а кусачками режьте.
- Закрутите отверткой провода на место, после получения желаемого (см. таблицу ниже) результата.
Интересно, что маяки слежения также считаются радиостанциями.
| Название | Cutting | Mending | Pulsing |
|---|---|---|---|
| Output | Отключает динамик | Восстанавливает функционал | Включает/выключает динамик |
| Input | Отключает микрофон. | Восстанавливает функционал | Включает/выключает микрофон |
| Dummy | Ничего | Включает/выключает микрофон и динамик | |
 Офицерская газмаска▼

У СБ противогаза есть скрытая настройка агрессивности. Чем выше агрессивность, тем более злобные крики «щитсека» раздаются при использовании функции HALT.
С помощью отвёртки ![]() изменяйте фразы. Для максимальной агрессивности используйте кусачки
изменяйте фразы. Для максимальной агрессивности используйте кусачки![]() . Обратите внимание, что после перекусывания
. Обратите внимание, что после перекусывания ![]() сбросить это положение невозможно.
сбросить это положение невозможно.
Емаг ![]() изменит обычные фразы на длинную цепочку ругательств.
изменит обычные фразы на длинную цепочку ругательств.
 Хранилища костюмов▼

То, что никто не пойдет проверять.
- Убедитесь, что отсек для хранения закрыт.
- Открутите отверткой провода, чтобы обнажить проводку.
- Пульсируйте мультитулом провода, чтобы узнать что они делают, а кусачками режьте.
- Закрутите отверткой провода на место, после получения желаемого (см. таблицу ниже) результата.
| Название | Cutting | Mending | Pulsing |
|---|---|---|---|
| Hack | Увеличивает эффективность дезинфекци
[The UV bulb is glowing] |
Восстанавливает низкую мощность дезинфекцию
[The UV bulb is dim] |
Меняет режим дезинфекции |
| Safety | Отключает проверку безопасности, позволяя проводить дезинфекцию живых людей
[The service light is off] |
Включает безопасность
[The service light is on] |
Включает/выключает проверку безопасности |
| High Voltage Circuit | Эффект искр | ||
| Nothing (2 wires) | Ничего | ||
 Тесла катушки▼

Всего один провод: подайте на него импульс![]() , чтобы вызвать разряд тока Теслы. Отлично, если вы подключите дистанционный сигнализатор
, чтобы вызвать разряд тока Теслы. Отлично, если вы подключите дистанционный сигнализатор![]() !
!